

Project Detail

Technology industry grow fast and vmware as a leading virtualization company support it well. In this post, I want to talk about kubernetes solution from VMware called Tanzu. I will concern to Vsphere with Tanzu deployment, as Tanzu itself had some variety of products.
If we talk about pruduct that want to be implemented into production site then we must think about cost, durability, *support*, resources, sustainable, maintenance, guide-forum & user friendly. We know that vmware had proved it since last decade. So lets check this out!
Lab Inventory :
- VMware ESXi 7 (3 host)
- vCenter server 7
- NSX-T 3.1.3.x ( Medium)
- Edge Node (Large)
- Storage (Shared storage 3 host can access)
- Backbone router.
- Windows Server Datacenter for active directory and DNS server.
Step 1 : NSX and Vcenter Integration
Add Compute Manager to connect NSX and Vcenter, don't forget to enable trust for certificate sync.

Create IP Pools for Transport nodes (Tep-Overlay) and Edge Nodes (Tep-Vlan) (TEP Interfaces)
 Transport Nodes with IP range 10.0.20.20 – 10.0.20.100
Edge Nodes pool with IP range 10.0.30.30 – 10.0.30.100
CREATE TRANSPORT NODES AND EDGE UPLINK PROFILES
VMware recommends a minimum of 1600 bytes for MTU but my suggestion is 1700 or higher for VDS, TEP Interfaces, Uplink and ESXI Vmkernel ports.
You can ignore(blank) MTU for Up-Overlay because it will auto follow MTU VDS

Ensure your configuration for Host Transport Nodes success & up *(green color)

Create Edge VMs
We need to deploy an edge cluster with a minimum of one Edge node.
Edge of Large size is needed to support NSX load balancers as part of enabling the workload management.

After Edge deployed we need to create EdgeCluster and add our edge into it.

Deployment of Networking NSX to Communicate with Backcone Router.
First we need to add VLAN based logical segment to be assigned to T0 as uplink for Backbone Router, check picture below:


Assign the above segments as Interfaces for T0 and do not forget to set MTU on interfaces to 1700 bytes.

Then configured BGP neighbours on T0, connect to uplink interfaces Backbone Router:

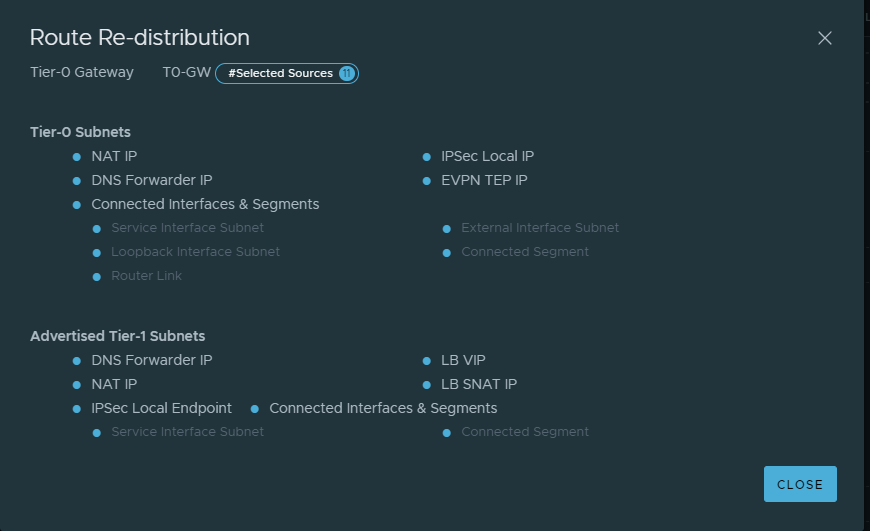
The important in BGP configuration on the T0, is to configure route redistribution, so that the core router acknowledge the subnets that will be created
and attached to the T1 that will be automatically created by the WCP service while enabling workload management.
Next is enable route redistribution in BGP on the T0, the route redistribution configuration should look like the below:
Step 2: Enabling Workload Management
Workload management is a feature from vmware to create tanzu environment from vcenter webclient and will create
the supervisor management cluster automatically to support creation our namespaces and getting our containerised webserver up and running.
Navigate to your vCenter server web client and click on Menu > Workload Management and then click on Get Started

Choose NSX-T deployment for our networking layer provider that utilise NSX NCP (Network Container Plugin).

There should be an option for the list of compatible clusters otherwise you have not enabled Trust while adding your vCenter as compute manager in NSX-T.

Next is size of deployment, I choose tiny to efficient my resources.

Now we should configure network parameter for supervisor cluster, ensure that your NTP is sync between your esxi, Vcenter, NSX Manager

Then configuring workload management-workload network
T1 router will automatically created since we have configured route redistribution over BGP to support network of Ingress and Egress CIDRs.
Those CIDR will shown after the workload management setup is complete

After that choose storage policy where it should be configured before.

The last is click finish to deploy supervisor cluster VMs and deploy all the related NSX segments, load balancers, T1, IP prefix rules, DFW and else.

The proccess will last for 30 minutes or more depend on your specification of hardware.

Once it Finished, then it will give notification runnning.

Lets create our first namespaces

The namespaces will shown on your Vcenter Webclient just like picture below:

We need a tools to connect our Vsphere with tanzu and namespaces, so lets download it from our tanzu environment.

Now lets access our Vsphere with Tanzu environment and namespaces to create our first containerised workload.

Finished!!!
Leave a Comment