

Project Detail

A Disaster Recovery Plan (DRP) is crucial for preventing datacenter outages like flooding, fires, earthquakes & etc. Furthermore, Site Recovery Manager is also useful as a planned migration tool to move virtual machines across datacenter with minimal outage.
Clarify confusion between vSphere Replication and VMware Site Recovery Manager, as SRM is an orchestrator It doesn’t perform any sort of replication & the file copy is handled by vSphere Replication (VM) or through storage array volume replication (LUN).
VMware Site Recovery Manager:
- Disaster Recovery orchestrator
- Does not replicate virtual machines
- Need subscription or paid license
- Can leverage VM-based replication or array-based replication
SRM License

vSphere Replication (VM-based replication):
- Copies virtual machine files to the remote site over the Network(LAN)
- Relies on vSphere Replication agents on the ESXi hosts
- The VR appliance contains the VR management and an embedded replication component
- Can be used on its own (vSphere Eenterplise Plus
Array-Based replication:
- Uses a middle man called Storage Replication Adapter (SRA) which enables SRM servers to communicate with the storage array
- Storage Array volumes are replicated using the array’s mechanism over the SAN
- Smallest item of granularity is the datastore
In this article I want to concern with SRM + vSphere Replication Manager as solution for Disaster Recovery Plan.
Please look picture below for topology and concept
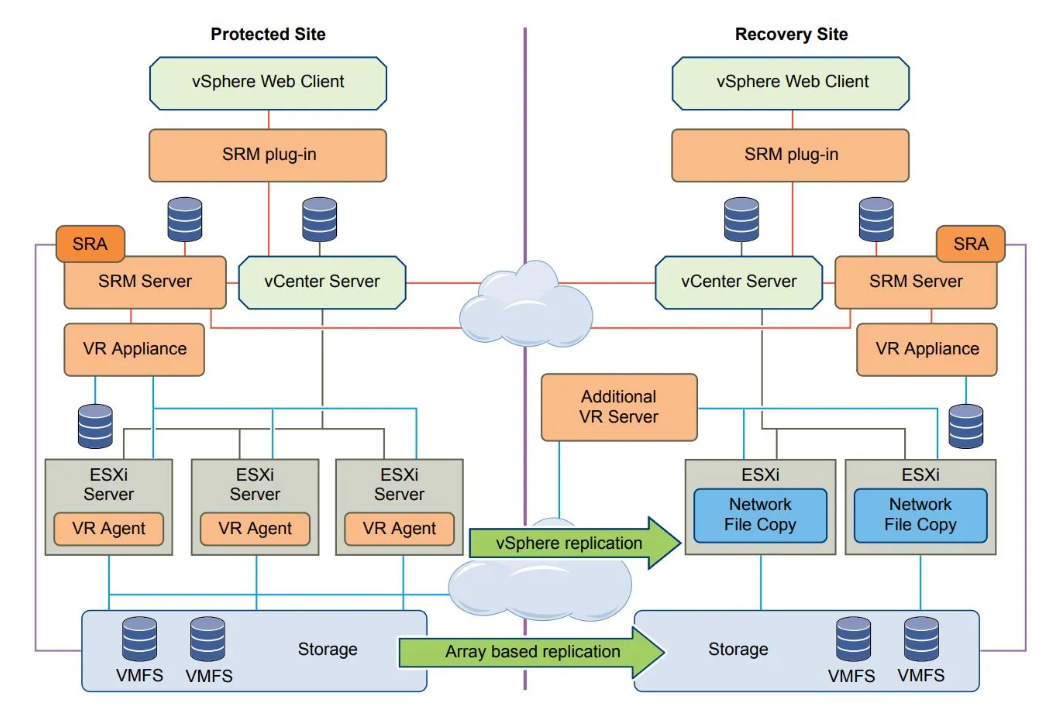
Overview Infrastructure, In this scenario, I have Site Production and Site Development with vcenter, site recovery manager(SRM) and vsphere replicate manager for each site.
Below is the IP Scenario:.

In this scenario I have installed SRM-VRM in my Datacenter.
Now we need to map folders, compute (named resources), network, storage & resources policies.
Note that, the protected site is called “Prod” and the recovery site is called “Dev”.
First, lets open vcenter then site Recovery. Ensure the status of SRM-VRM are green with OK.

Click view details

SRM-VRM Status Connected, this is sign that both site are sync and connected

Mapping Network
VMware Site Recovery Manager uses network mappings to know which portgroup to connect recovered virtual machines.

Folder Mapping
We need to map folder for replicate VM sources-destination. So that it will be easier to manage

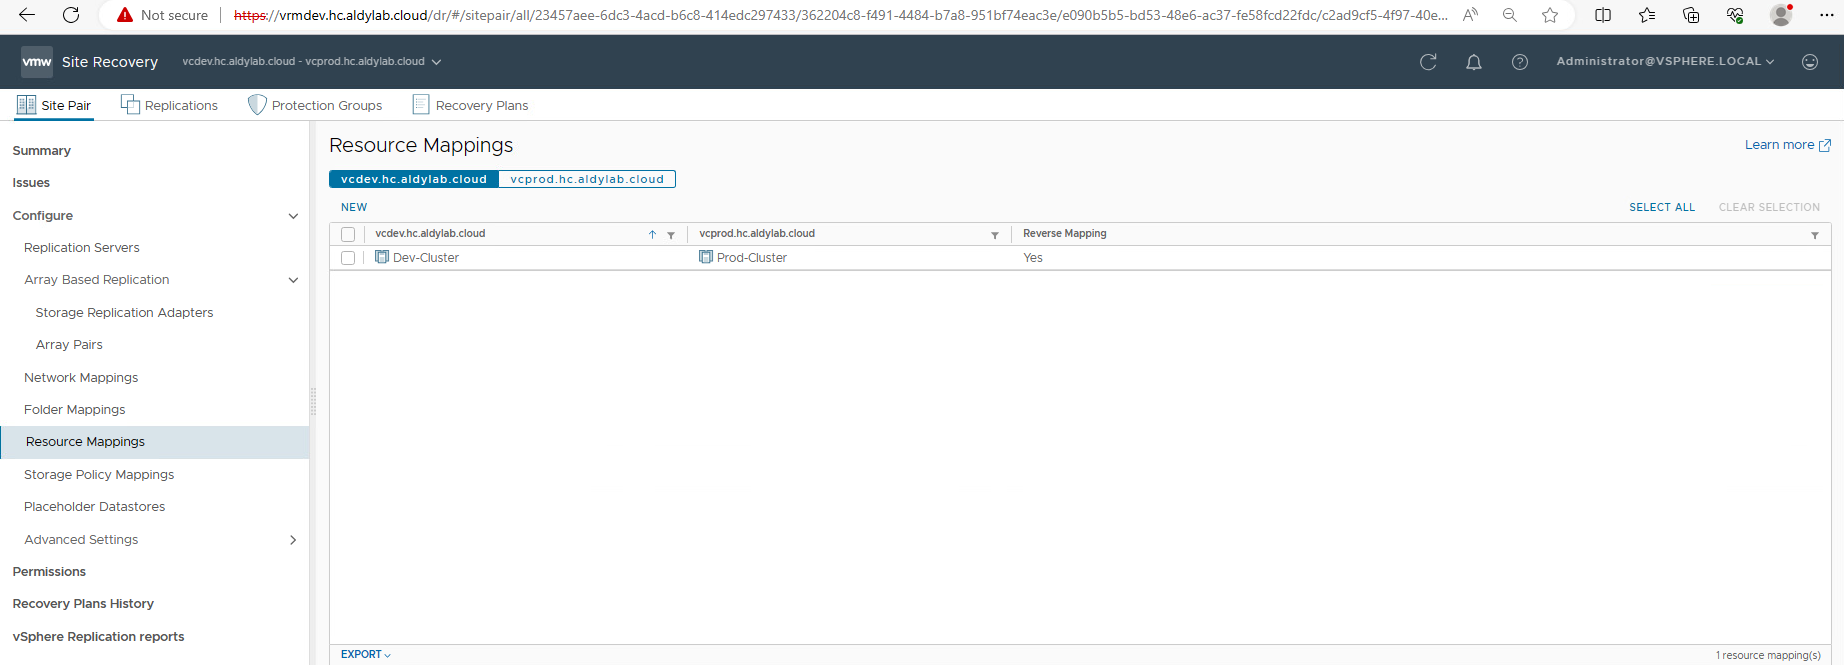
Resources Mapping
Map the compute resources which include resource pools, standalone hosts, vApps, or clusters
Map Storage Policy
I checklist all storage policy for this option setting

Map Placeholder Datastore
Choose datastore for your sources – destination replication
 After all of the configuration finished, now lets do a Disaster Recovery Plan simulation
Replicate VM
Choose our target site, this target connected with virtual replicate manager VM in Dev Site.

Then, select your vm that need to be replicate. In here I want my Grafana_10.95 (Production Site) replicate to Development Site.

We can manually choose target our datastore

The Replication Settings is very important as we are setting up the Recovery Point Objective (RPO) and general replication such as:
- Enable Point in time instances to adjust the snapshots of the source virtual to keep.
- Guest OS quiescing for VMs supporting it.
- Network compression for VR data to save network bandwidth and help reduce the buffer memory used on the VR server at the expense of CPU usage.
- Encryption for VR data. Note that it is automatically on for encrypted VMs.

You can specify new or existing protection groups directly from the wizard.

The sixth step, create new recovery plan.

The seventh step, due to missing folder mapping by system it asks to re-mapping folder. Lets choose our SRM_VRM-Dev folder

After configured all the step, we can review then click finish

In VMware Site Recovery Manager, recovery plans are flexible, customizable and automated run books that orchestrates the recovery process.
- A recovery plan includes one or more protection groups.
- A protection group can be part of multiple recovery plans.
In the screenshots below we already created a recovery plan (Prod-Dev_GrafanaRP) in the protection group wizard so we’ll see how to configure it here.
Keep in mind that Test functionality of site recovery manager will only start VM and check for the VMware Tools by default.
This is fine to check that SRM works but not enough in a production environment.
*Testing recovery plans does not impact production as long as the test network doesn’t incur an IP conflict*

In the wizard you can choose to replicate the changes that occurred since the last replication.
Checking it simulates a planned failover while leaving it unchecked simulates a disaster recovery scenario where the source VM is unavailable.
Click Next then finish

You can monitor the progress of the job in the recovery plan page and follow what action is being performed.
Note that, by default, it will wait for the VMware Tools before proceeding to the next step.

Once the job is finished, you can look in the vCenter at the recovery site and you will find the recovered virtual machines in running state.
Again, the source VMs are not impacted and remain running.
After test complete, vm will use isolated network card

Now Lets cleanup
Once you are happy with your DR test, hit the CLEANUP button to remove the test environment and reset the plan to ready state.


Run Recovery Plan
In the previous test section, we started a copy of the protected VM in an isolated network in the recovery environment while the source VM was kept running.
Now we will execute the recovery plan which will switch the workload to the recovery environment.
Note that there are 2 methods for Site recovery manager to execute a recovery plan:
- Planned Migration: Replicate recent changes to the recovery site and cancel recovery if errors are encountered.
- Disaster Recovery: Attempt to replicate recent changes to the recovery site, but otherwise use the most recent data. Continue recovery even if errors are encountered.
In this example, we will be performing the Disaster Recovery.
- On the recovery plan page, make sure the status is Ready and click on the RUN button and Next.

Click Finish to launch the operation.

Once the operation is completed, you will notice in vCenter that the source virtual machines are switched off and Recovery VM in Dev-DC is power on.

Reprotect
When a recovery plan is executed, the workloads are switched to the recovery site but what happens when you want to go back to normal and move them back to their original site?
This is known as the failback process which consists of making the recovered VM into the protected virtual machine (the protected site becomes the recovery site)
and execute the recovery plan in the other direction.
Now lets assume, you have ensure to operate Vm in DRC site, then lets reprotect
 Confirm reprotect and checklist the options then next

Lets review our configuration then click finish
 We can monitor the process and expand the details
 After Finish, the vm will automaticly power on in DRC site
 Note that the Reprotect operation has no impact on the state of the VM. It simply turns the original protected VM into the replica
Leave a Comment